Star Trails
Friday, January 9th, 2009
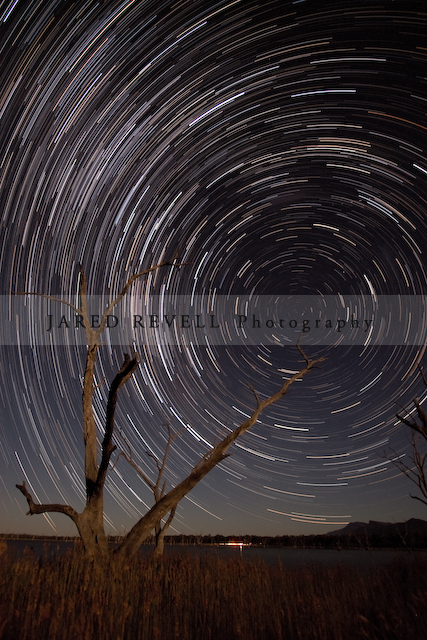
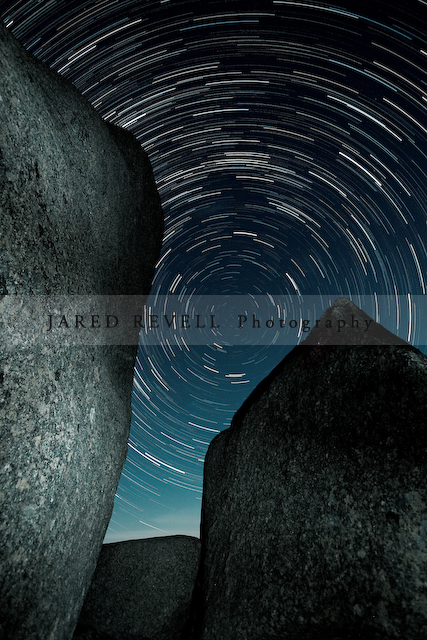
On our recent trip to the Grampians, Neil and I did some late night star trail photography at Lake Fyans.
A few people have asked me how I did it, so I thought I’d share my information with you all.
 |
 |
With digital cameras and remote shutter releases, it’s fairly straightforward to take star trail photos. I recommend taking multiple shorter exposures and merging them because digital sensors build up heat over long exposures, causing red/purple casts to appear at the edges of the sensor and ruining your shot. Using shorter exposures is a way around this.
For my photos above, the details are below.
Camera Settings
Camera: Canon 40D
Lens: EF-S 10-22mm
Focal Length: 10mm
Aperture: f4.0
ISO: 800
Shutter Speed: 30 seconds x 114 shots & 111 shots
WB: Auto White Balance
Format: RAW
Tripod
Remote shutter release cable
Drive mode: Continuous shooting (burst)
Focus point on the tree (using a torch to illuminate the tree to get the focus point)
Processing
Step 1: (RAW file adjustments to all 114 shots)
Exposure adjustment: +0.9 (to get the exposure level I was after)
Exported the 114 shots as JPEG
Step 2: (Merging photos)
There are a couple of methods of doing the photo merging.
Achim Schaller has written a wonderful Startrails Application to merge all exposures into one JPEG.
It also can create a time-lapse movie ! (see mine below)
Another method is to use Photoshop and combine all layers using “lighten” merging. A handy and time saving method is to use Chris Schur’s Photoshop action.
Step 3: (JPEG Adjustment)
Sharpening (50%)
Noise Reduction (100% colour & luminance)
Celestial Positioning
Depending on what effect you are after, compose your shot accordingly.
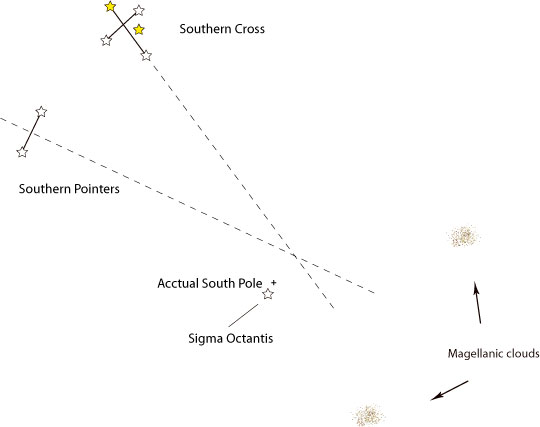
For my photo above, I composed the shot using the south celestial pole (see image below sourced from wikipedia) which give the circular effect.
The north and south celestial poles are the two imaginary points in the sky where the Earth’s axis of rotation intersects the imaginary rotating sphere of stars called the celestial sphere. The poles appear directly overhead to an observer at the North and South Pole’s.
For those living in the southern hemisphere, there are a few methods to find the south celestial pole.
Southern Cross Method
The south celestial pole can be located from the Southern Cross and its two pointer stars.
Looking up at the Southern Cross, draw an imaginary line from the two stars at the extreme ends of the long axis of the cross and follow this line through the sky. You can either go four and a half times the distance of the long axis on the Southern Cross in the direction the narrow end of the cross points, or join the two pointer stars with a line, divide this line in half, then at right angles draw another imaginary line through the sky until it meets the line from the Southern Cross. At this crossing point is the south celestial pole.
Magellanic Clouds Method
Using the Magellanic Clouds clouds in the southern sky, make an equilateral triangle, the third point of which is the south celestial pole.
Compass Method
Using a compass, locate true south and point up to an angle equivalent to your latitude.
For example, if you were in Melbourne CBD (-37.814056,144.96168), then using your compass facing true south and looking up at an angle of 37.8° will give you the south celestial pole.
Celestial Movement
Below is a compiled video of all of my 114 exposures from Lake Fyans in the Grampians, showing the celestial movement around the south celestial pole, located at the end of the tree’s branch. (Thanks to “Achim Schaller” for this wonderful application).
You’ll notice too that the light seems to fade on the lake and the tree goes in shadow. This was because the moon was behind us and was fading to the horizon over the hour of exposure. Also the bright light appearing across the lake at the end of the sequence was a car.
For a great article on Night Sky Photography from NightSkyPix, showing it’s not that difficult to get into the hobby, see this link:
How To Photograph Star Trails – We Show How Easy It Can Be To Capture Your First Star Trail Photo

Thanks for the info. I should get out sometime and do some star trails myself 😉
I was going to ask why you were using ISO800, but I’m guessing it was to keep the shutter speed at/below 30 seconds, so you didn’t have to revert to bulb mode, but could use continuous shooting mode.
No worries Martin 🙂
Yep, to keep the continuous burst mode going at maximum of 30 seconds, I set ISO to 800.
It probably wouldn’t hurt to go a stop more, like ISO1600 as I modified the exposure to +0.9 during post processing. Maybe a test for another time to check what the noise is like.
Hrm…I wonder if EOS Capture allows you to specify a shutter time of longer than 30 seconds…as that would provide a way to take lots of exposures at ISO100 and > 30 second shutter speeds.
hmmm…that’s a good question, worth having a look.
I just had a look now at EOS Utility and it looks like you only set the shutter to a maximum of 30 seconds…bummer.
If it did allow you to go longer that would be the way to go, only thing you’d have to allow for is making sure that your laptop doesn’t run out of battery during the shoot.
Thanks for the idea Martin ! 🙂
The other option is to make a custom cable release, connect it to your PC’s serial cable, and write a few lines of code to hold the shutter open for a specified amount of time. That would allow you to take successive photos at any shutter duration, including shutter durations over 30 seconds, as you could get the PC to hold the shutter open for as long as you want in bulb mode.
Thanks for doing this, I can’t wait to try it.
Kevin
No worries Kevin 🙂
Hi Jared
Excellent tips!
What application are you using to have the media player plugin in your blog with the movie above?
I uploaded a star trail movie to youtube and the quality ended up terrible.
Cheers
Hi Mike,
Thanks 🙂
I used Achim Schaller’s application which can be found here http://www.startrails.de/html/software.html
There is a link to it in the post, but I’ve found that the video is only being displayed in FireFox, not IE.
And I just used the add media button in the WordPress post window and selected the uploaded video and it did the rest.
hope this helps.
Jared
Thanks Jared, I already use startrails.de – I was just wondering about adding it to the blog – how big is your avi file?
What codec did you use when creating it?
Cheers
brilliant stuff Jared, this post will come in handy when i get around to trying it myself one day! also, i’ve seen some shots of the magellanic clouds done with a 50mm lens that have come out great – something to consider
Great pic Jared. Just a further point in case any readers were wondering, and presumably why you did, is why take so many multiple shots rather than one long exposure (is can be done with film cameras). All digital sensors will eventually build up heat which causes a purplish ghosting to appear at the edges of the sensor (infrared exposure of the sensor). At present I don’t know of any cameras that have fixed this problem completely and the only way to ensure no ghosting is to take multiple shots as you have done.
Cheers Wayne 🙂
Thanks for adding the extra information regarding the heat build up.
Hi Jared,
You might be interested in the canon timer remote controller (TC80-N3)- i havent used it myself but apparently you can set the exposure time, interval time and number of exposures(up to 99 i think) That way you could shoot longer than 30sec with-out needing continuos shooting mode and allow you to use a lower ISO. Just a thought!
Great images by the way
chur
Thanks mate,
I have seen the TC-80N3, it would come in handy, but it is pricey.
Happy with my current method as the noise isn’t too bad, but maybe one day I’ll get the and give it a go.
Thanks for stopping by and adding the info, appreciate it mate!
cheers,
Jared
Hi Jared,
First of all, wonderful job!
Last night I went and did my first attempt at star trail photography. I pretty much followed your settings to the letter, only using a 50d. +.9ev on 105 separate exposures in Lightroom, exported to Jpegs then stacked using the “StarTrails” application. I opted for a “safe” approach and went down the coast here in Victoria to Bass Strait (due south). It was so dark I had no foreground object to use, so at the end of the shot I “painted” the fence and shrubs in the foreground with my car’s headlights for 10 seconds or so. I just wanted to know if that’s something you’ve done in your shots, or have you had the luck of good available light to paint your foreground? Thanks, and keep it up, you do wonderful work all round.
http://fazz1977.deviantart.com/art/southward-night-sky-147547753
Hi Sean,
Thanks for your feedback mate, glad to know my post has helped people get out and try star trails.
I have a LED Lenser torch I carry with me wherever I go which is pretty powerful. I use that for foreground lighting, as well as for focusing.
Car headlights would do the same job ~ but hard to get the car up the top of Mt Buffalo 😉
Your star trail looks great ! Was it taken from the car park near the lighthouse? I actually thought they locked it after hours…I might have to go down again soon…the lighthouse as a foreground would work well I think.
cheers,
Jared
Hi Jared,
I actually have a small version of that torch, pretty good for that kind of thing. I keep it in the car or in my kit if I remember.
Haha, good point. Wow, haven’t been up that way in a while. Been thinking of doing star trails up Gembrook way, away from city lights, or possibly out Marysville way.
That shot was taken at the bottom of whats called “blowhole track”. Drive into Flinders, turn right at the roundabout, a couple of KMs down the road it goes straight or veers left along the coast, go down there along the cape towards the lighthouse, after another couple of KMs there’s a dirt track, blowhole track. I’ve done a couple of landscape shoots down there during the day too.
Thanks again for the kudos mate, also was pleasently suprised to see you’re a victorian also.
Cool.

Yep, I know the blowhole at Flinders, great spot. I spent a sunset down there once.
Took this shot down there that night
Startrails in Marysville sound great, hope they turn out well!
🙂
That photograph is so awesome. I will have to try this out one day. I don’t suppose you can get this effect with a point and shoot?
Thanks Jodie.
could work depending on the point n shoot…but you’ll need either a shutter release or be able to choose a long exposure.
cheers
That is some awesome info.. thanks for sharing..
Thanks for share and very impressive pictures anyway.
Did you activate in the camera the noise reduction for a long exposure in each of the 30″ shots?
Thanks a lot and good job 😉
Hi Jose,
No, I didn’t activate the noise reduction in camera.
I think if that is activated, you cannot do burst as the noise reduction usually takes some time before you can take the next shot, but I haven’t tested it.
cheers
Looks like it the stars are creating a blackhole :). nice art in your photo Jared.. 🙂 It seems like you love astronomy. 🙂
Thanks for sharing the beautiful image above!
Hi Jared
Great photos. I am actually heading down to the Grampians just before christmas and have been waiting patiently to try my first star trail for months now.
I noticed you mentioned there was a moon out that night. Is it better to shoot star trails with or without the moon. I will be taking the pictures (weather permitting) between first quarter and full moon. I know that the moon will set in the early hours so I could take the picture after it sets and paint the foreground. What would you recomend.
Thanks again for the info one of the best I have read.
Cheers
Patrick
Hi Patrick,
sorry for the delay in replying, I hadn’t been receiving comment notifications, so was unaware of your question.
That’s a good question.
I haven’t taken a star trail for a long while now…
Couple of things come to mind, the moon out would be useful to light up any foreground subjects. I’ve used torches as well for spot lighting.
With the moon in, I would think the stars would appear brighter and sky darker.
How did your shoot go?
cheers,
Jared
wow good!!!!!
Excellent tips for photography.Backgrounds of both the images are very amazing.Keep it up
Hey Jared
Thanks for the reply.
In the end I did the shoot when the moon had set. It went really well I think. There is so little light polution up there and I never had seen the milky way in so much detail before. I painted in a tree in the foregound with a torch but in the end I didn’t use this frame in the final image as I though it took away from the image.
Here is the final image.
https://docs.google.com/file/d/0BxTae3saVsH8SDFXcDAtT1ROZUU/edit?usp=sharing
Thanks again for the info
Cheers
Patrick
Hi Patrick,
It looks great, I’m glad you were happy with your result!
cheers,
Jared
Jared
For some reason the preview on the link is poor quality. You need to download the image to see it properly.
Thanks again
Patrick